Wednesday, August 7, 2013

Sadie bug

Well, this might be a new record... for the length of time between posts. Yikes! Other than my usual excuse of school, this is the main reason I haven't taken the time to blog:


I've been playing with this beautiful little girl named Sadie:


She was our early Christmas present and we have had so much fun watching her grow. 


It has been an adjustment, but we adore her! She is huge now. Looks like a grown-up dog but definitely still a puppy.


We are in the middle of obedience classes right now, which means much of my summer has been spent practicing with her and doing "homework". She is very smart and learns quickly... but she is also full of SO. MUCH. ENERGY!


She went to the beach with us for New Year's and it was precious. She loved digging in the sand and trying to drink the water. We can't wait to take her back. 


When we can, we get her together with her two sisters who live in the area.  


Two of my co-workers have her sisters (they were actually delivered to us at school on the last day before winter break!)


Cuteness overload, right? 


I have plenty of house catch-up to do on the blog... whenever she'll let me!  


Saturday, September 15, 2012

Laundry Room

I already posted about my favorite part of the laundry room (the ceiling)... every last detail about it.  So now, here is the rest of the room!

This was our lovely laundry room when we first moved in to our house (excuse the terrible lighting).  It was the same Duke blue as the kitchen & half bath.  Yikes.


We took down the shelf, painted the walls & trim, replaced the light fixture & flooring, and added some hardware to the cabinets.  We didn't love the layout & weren't sure what to do with the room, so we lived with it like this for awhile (with a new dryer when the old when died). 


Here is another pic with a wider view.  


I searched for inspiration everywhere to try to decide what to do with the room, and eventually we decided that we really wanted the cabinets to be over the washer & dryer...


which meant moving the washer & dryer.  It was not exactly an easy task... but the hubs ran new pipe for the washing machine (and put in a new washer box that will be lower & therefore not visible), patched the wall, then ran a new dryer vent a few feet over from the old one.


We also finally found a good deal on the matching washer to our previously purchased dryer and put them both in their new places on the other wall, and patched & painted some more drywall.  

We decided to fill the extra space on the cabinet wall with shelves instead of trying to buy a third cabinet or larger cabinets.  We wanted the shelves in the middle, so we moved the right cabinet over.


The cabinets got a couple of coats of white paint, and I also painted the crown molding and the molding I bought for the shelves before I put it all up.  We also bought a piece of plywood from a local lumber company and painted it white for the countertop.


I borrowed my dad's compound mitre saw and used it to cut the crown molding, then used our nail gun & air compressor (my new fav. toys) to put it up.  I also cut the molding for the shelf supports and nailed them to the wall & the cabinets, and then used a circular saw to cut the shelving board and put the shelves in place.

I also nailed some molding to the front of the shelves to make them look thicker.  Hubby screwed in supports for the counter and once that was in place, it was just time to caulk, touch-up paint, accessorize, and call it a day!  


Luckily, we also have a shelf and rack behind the door where we can hang clothes to dry.  We also keep our recycling bins and a hamper back there, where it is nicely hidden but handy.

The last finishing touch in the room was a place to keep Hubby's shoes, which always come off inside the side door and have not had a proper home (other than the laundry room floor).  My parents bought this shoe cabinet from Ikea and painted it to put in their entry way.


We bought the same one and totally copied their idea.  We painted it white & added some fun Anthro hardware.  We put a base of 2x4s underneath it to raise it up a few inches so that we could run some extra baseboard around it to give it a built-in look.  We also added some molding around the edges to complete the look.  


It has been great!  It fits perfectly on the wall across from the washer & dryer, next to the doorway.  It can fit 8 pairs of shoes in it, which has been incredibly helpful.  And we love the way it looks, too.  The best part- it was only $30.  You have to love Ikea.

One last comparison of our finished laundry room:


In love!


Monday, August 6, 2012

Stamp of Approval

My favorite project this summer was re-doing our laundry room. My favorite part of that project was the ceiling.


I knew I wanted to do a fun pattern in the room (the laundry room is the perfect place to take a risk since it is small and not a central room in the house!) My first thought was wallpaper, but all the ones I love are just too pricey. So I thought about doing a stencil like this:

image from here

But... we've been there & done that, so I wanted to think of something different. I really liked the wall color, so I decided to focus on the ceiling instead. We had a couple of shades of teal paint samples (one from the bathroom mirror and one that is my parents' exterior door color), so I painted a sample of each color on paper.

I thought about trying to make some sort of stamp (I was afraid I wouldn't be able to find a rubber stamp that would be big enough to make a statement), but figured I would check out Hobby Lobby's stamp aisle just in case. 


This guy caught my eye immediately. Bonus: it was less than $5 thanks to a 40% coupon I pulled up on my phone!

Next came a trip to Home Depot for some metallic gold paint (which was a little more expensive than I planned since the shade I wanted only comes in the quart size, not in the small sample jars)


I used an old small brush to brush the paint onto the stamp and did a little trial stamping on my painted paper samples.


I decided that I liked the darker, more smudged stamp look and that I should just GO FOR IT on the ceiling. Worst case scenario: it's not a big space to paint over. 

So I painted the ceiling the teal color and after spending a couple days putting up crown molding, I was ready to plan out the spacing of the stamps. I kind of liked the spacing on the rough draft sample, so I measured the distance between each stamp and made a template from a grocery bag & hole punch:


I started at the corner of the ceiling and held up the template, making a pencil dot in each hole. I just overlapped the holes and kept going in rows until the whole ceiling was covered with (not quite) evenly-spaced dots. 


You can't see the dots very well, but I promise they are there. After I rested my neck for awhile, I started the stamping. 


It actually went pretty quickly, thanks to a good Pandora station. The actual stamping took less than 2 hours.


The paint was the perfect shade of gold and I am absolutely THRILLED with the results. Who would have thought that a 5-dollar stamp from Hobby Lobby would completely change the look of our laundry room? The best part is the metallic shine that really brings your attention to the ceiling.


Obsessed. So worth the risk! More laundry room pics to come...


Monday, July 30, 2012

Kitchen Update

We were hard at work in the kitchen this spring, and are finally finishing it up this summer! We got our new appliances and counter tops, and tiled the backsplash. We are LOVING how it has turned out. It looked like this back in March:


And now:


We went with soapstone tops, which we LOVE (just have to keep up with the oiling). Luckily the oiling part is supposed to get easier after the first year, so by then we'll have the look we love without the maintenance. It was really interesting when it was first installed:


After the first coat of mineral oil:


Luckily the shine goes away once you wipe off the excess oil.


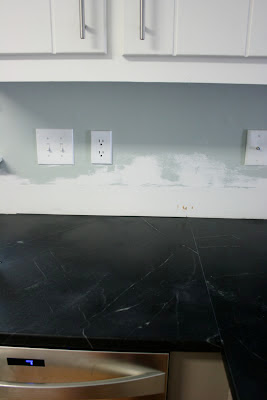
Thanks to the old laminate 4" backsplash, our walls were a mess.  We patched, sanded, and decided on a tile:


I love, love, LOVE this tile. I saw it for the first time a couple of years ago (and it was one of the first things I pinned on Pinterest over a year ago), but we couldn't find it online when we started looking, so I didn't think it would be an option. Once we realized that there was no penny tile the exact color we wanted, we went to a local tile showroom and discovered that they could order this one for us! So. excited.


It wasn't the easiest process, although it wasn't so much hard as it was tedious. Thanks to my dad for letting us borrow his wet saw (and every other tile tool)!


We actually worked together pretty well to put it up. Stephen cut with the wet saw while I made smaller cuts with the nippers, and then we took turns spreading the thinset and worked together to line up each piece. 


Then we spent a couple of days cutting all of the edge pieces putting them in before I grouted.  


We chose a sandy-colored grout that looked similar to our lower cabinet color. We wanted something other than white so that the tile shape would stand out, but didn't want it to be an overwhelming busy contrast with a dark grout, either. 

After some caulking and cutting & painting trim pieces to match, it was done! 


We also found a piece of marble for our dresser island, which I am in the process of painting now! We just have to get it cut down a little and have the edges finished, but it will be perfect.


So as of now, our kitchen has gone from this:


to this:


and now to this:


I can't wait to take an updated photo later this week once the dresser is finished (we are painting it the same color as the lower cabinets).


The window seat is almost done and once we get to the electrical work, the whole kitchen will be finished! We added a family photo collage wall above the buffet, which as of now we are just going to leave as-is (it seems to need the warmth of that wood!), but of course that could change in the future. So close to being done!


Monday, March 5, 2012

Dreams Do Come True

The first dream that came true today is finally getting a real snow day!!  There was not much snow on the ground, but who cares?  The only other snow day we had this year came on a teacher WORK DAY, so it didn’t count.  So exciting!!

A typical snow day for me = organizing something OR spending hours on the computer.  Today, the computer won.  I played on Pinterest, downloaded fonts, read blogs, etc.  Our house is a bit of a mess, so I feel like organizing wouldn’t be a fantastic use of my time... it’s not like it’s going to make a difference in this disaster!

Though that does lead me to dream #2... which is in the process of coming true.  Our house is a mess right now because we are beginning “Update the Kitchen: Phase 2”.  This is the phase that I’d planned on happening faaaarrr in the future, but it is happening now!!  The last time I posted about the kitchen, it looked like this:


I also posted about building the window seat (although it is still waiting for me to overcome my sewing fears and make it a cushion).  


We also bought a buffet from Craigslist that will go on the long wall in the breakfast area.  My plan is to paint it white, although that could change.  I don't want it to be a wash-out.  We will probably switch the table, and obviously need to move the pendant light over now that the table has moved.  I’m thinking maybe a white plate collage over the buffet?  No matter what, that area is not even close to finished!


We have also brought in an old dresser of my mom’s to use as an island.  It’s been sitting in the middle of our kitchen for months now, and we’ve officially decided that we like it.  It doesn’t get in the way and gives us some extra counter space.  Plus more storage, which is always a plus. 


As you may or may not be able to see, the dresser needs a little work.  The original plan was to paint it the same color as our lower cabinets.  Then I really liked the wood look, so we thought about just trying to re-stain it... but I think we’re back to painting.  I also kinda need to get the drawers from my mom’s house... and figure out what to put on the top for a more usable counter top.  I’ve been thinking carrara marble.

carrara marble image from here

We are going to wait to make that decision until our NEW COUNTERTOPS AND APPLIANCES are in (!!!!!)  We finally made some decisions and bought our refrigerator, dishwasher, and range over the weekend.   

 Our new appliances, all from Sears.

I'm excited, of course, about the new appliances.  The dishwasher is supposed to be incredibly quiet, which will be such a change from our current one, which sounds like a never-ending freight train!  I am MOST excited about our range, though.  I have wanted this range for (literally) years.  I even convinced my parents to get it when they bought the appliances for their new kitchen!  Luckily they have loved it, and we are pumped to get one for ourselves.  I am soooo excited to get ride of the typical free-standing range.  I can't wait to clean this one!  It will be so much better.  

We also narrowed down our countertop choices.  I have REALLY been wanting soapstone for the longest time. 

soapstone image from here

But... when we went to the stone yard, we really loved the leather-finish granite options.  We didn’t want the typical shiny granite that everyone seems to have these days, and the leather finish gives it a completely different look, without the added early maintenance of soapstone.  Plus, hubby didn’t really feel strongly about soapstone like I did, and he LOVES the leather-finish granite.  So... we’ll see!

Of course, along with new countertops comes a tile backsplash.  We don't have a backsplash right now, which has been fine (especially since we love our paint color!) but we think tile will really bring a finishing touch to the "new" kitchen.  I have always had a slight love affair with penny tile, and always dreamed of having a place (or two!) to use some in our house.  

penny round image from here

We got some samples from The TIle Shop this weekend (shown in the same picture of the buffet from above).  Both of us really like the furthest color, "Moss".  It is mainly gray, but with some greenish shades, so I think it will really coordinate with our wall color.


So, the to-do list includes:

- paint dresser for island
- paint buffet?
- sew cushion for window seat
- install new appliances
- have new counters installed
- pick out & install island counter
- decide on backsplash tile
- TILE the backsplash

Also very high on my priorities list is to replace our AWFUL fluorescent light fixture with recessed lighting!  Fingers crossed that gets done soon, too!!


Designed by Lena